
Photographs by John Crispin
Making Period Doors From Plank to Paint
When Richard Pieper began restoring his vernacular farmhouse, he knew he would be re-creating parts lost over two centuries of architectural changes. Erected in a rural valley east of Albany, New York, around 1790, the house was slowly losing key structural members in the Dutch timber frame. Plus, an 1830s makeover had updated the exterior with Greek Revival details, and in 1990 remodelers rearranged walls and rooms on the first floor. And then there were those doors.
After he bought the house in 1992, Richard assumed the original front door was long gone—that is, until he opened walls in the attic. There, nailed across studs as a brace, and plastered with newspapers, were three boards spanning nearly a yard in width. When he wasn’t spending weekends restoring the house with brother Robert and friend Hugo Corrigan, Richard was in the field as Director of Preservation for a New York City architectural firm. He recognized the boards as the classic pattern of an 18th-century three-board batten door—most likely his door.
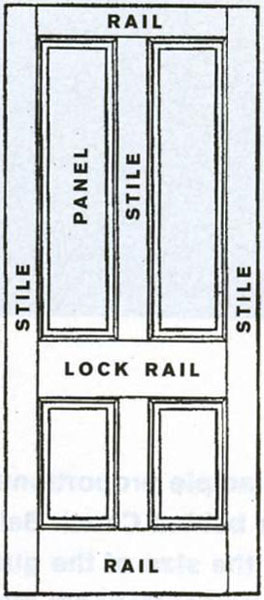
What Defines A Door?
Exterior doors must withstand tremendous seasonal forces. In winter, they’re dry and warm on the interior side, wet and cold on the exterior. In summer the conditions are nearly reversed. All these changes in moisture and temperature contribute to wood expansion and contraction that would quickly warp a door made from a single board. The solution in traditional joinery is to construct the door with multiple boards in ways that counteract these forces.

BATTEN DOORS
To create a relatively stable door, batten doors simply run battens (horizontal boards) across a set of vertical boards. Beyond the usual edge-matching of boards, there is no joinery in a batten door, so it must rely on fasteners (screws or nails) to hold it together. Traditional batten doors are clinch-nailed, a method where the carpenter drives the nail through the door once, then bends the shank over so it penetrates the wood again. Traditionally, handmade wrought nails were the best for clinching. Since the metal grain runs with the length of the nail, they are less likely to break. Cut nails, on the other hand, tend to snap because the metal grain runs perpendicular to the length of the nail.
FRAME-AND-PANEL DOORS
A more stable method for making a door is to fashion a frame of stiles and rails. This frame holds panels in such a way that they are free to move with seasonal changes. The number and pattern of panels in any door (as well as their decoration) may vary widely, but the construction remains principally the same. Traditional panel door frames are held together with mortise and tenon joints, secured with pegs through the sides of the tenon, or wedges on the end. If the joints in a frame-and-panel door do not remain tight all year round, the door will sag. A particular concern is compression set. This is a phenomenon where wood in a confined joint expands to the point the fibers become compressed, never to regain their original dimensions. To avoid the problems of compression set, doormakers never use tenons over a certain size.

Carpenters of the 18th century often made doors with three exterior boards because they could ioln them with a standard bead-and-bevel joint (see drawing).

Later, Richard discovered equally revealing evidence about a side door added in the 1830s. Working with Chuck Bellinger of Architectural Components Inc. he turned this promising evidence into museum quality reproductions. The steps they used provide a quick education in not only what doors of the 1790s and the 1840s look like, but also how they can be constructed.
BATTEN DOOR BEGINNINGS
Once Richard pried his lucky find out of the attic, it was clear he had uncovered a fully battened exterior door. Unlike a two- or three-batten door, which uses a minimum of boards to span the back, a fully battened door runs boards horizontally (or diagonally) the full length of the door. This method of construction, while still not as sophisticated as a panel door, is common for exterior doors because it creates a thicker—hence warmer—door than the two-batten method. A fully battened door also offers far more security than a thinner version.
Richard carefully measured all the details so that Chuck could reproduce them in the shop. The outer vertical finish boards are mated in a “feather edge” joint much used in the 18th century for interior paneling as well as doors. Here, both edges of the middle board are planed into bevels so they fit into grooves on both the large outer boards, which are moulded at their edges. On the backside, however, the horizontal battens are matched in a shiplap joint finished with a flattened thumbnail bead. Each of these methods adds weather-blocking integrity to board junctions, while disguising joints with decorative shadow lines. Like the original, Richard chose to make the new door from eastern white pine, an easy-to-work species often used for exterior trim. The outside boards are 7/8″ thick; inside boards measure up to 3/4″.
Though all the joinery on the original door would have been cut with hand planes, Chuck’s shop used a modern power-driven shaper and stock feeder to make all moulded and beveled edges on the door boards, as well as the thumbnail profile in the door battens. In this tool, the shaper motor in the base powers the patterned knives that rotate above the table. Wheels in the bottom of the feeder, positioned on top of the table, feed the stock, making for a smoother finished product than feeding by hand. Having the feeder wheels on top not only protects the user, it maintains a constant back-to-front thickness dimension in critical parts, such as panels. Since the feather edge bevel is a common pattern in Chuck’s business, the knives are always in the shop. However, the flattened thumbnail pattern that Richard specified for the battens had to be copied from the original door and then custom ground.
In Richard’s original batten door, the clinched nails are T-heads—that is, handmade wrought nails with heads flattened on two sides so they resemble the letter T in profile. Richard had a modern blacksmith rehead his nails with this period technique. T-head nails are only 1/8″ or so in width and less conspicuous in the work—finish nails in effect. The blacksmith also annealed (heated and slowly cooled) the reproduction nails, a process that removes the brittleness from the metal so the nails can be clinched. Beyond this, batten door assembly is basically a matter of nailing the intersection of every two boards, while making sure board ends are well attached.
THE PANEL DOOR PROCESS
While investigating the side entrance on the gable end of the house, Richard uncovered a piece of old door stile nailed to the framing—a tantalizing clue to a past appearance. Though only a fragment, the stile provided nearly all the information to deduce the size and proportions of a much earlier door. By looking at the paint ghosts, Richard determined that this was a flat-panel door with square-edge stiles and rails—pretty typical joinery for the 1830s to 1860s. The number and positions of mortises showed there was a single lock rail, which meant the door had four panels. Moreover, the lock rail was wide at 11 1/8″—unusual, but not surprising in a vernacular farmhouse. The doorway itself provided the width dimension. At 76″ tall then, this was once a rather squat door: wide and short.
As the name implies, a panel door is basically a rigid frame of stiles and rails. The remainder of the door is filled with panels that float in grooves in the frame, so they are are free to expand and contract. The frame is secured not with nails, but mortise and tenon joints. After documenting all the door’s dimensions, Richard composed shop drawings for the new door. The one departure was increasing the original 1 1/8″ thickness by 1/4″ to make the door a little more energy efficient. Again, the door would be made from eastern white pine.
When making panel doors of this era, Chuck’s shop uses full mortises (also called through mortises) that extend completely through the stiles. This construction method is traditional, plus it provides the joint with maximum strength. (In a concession to looks, after 1880 door makers started to use half or blind tenons that do not penetrate the stile.)
SHOP SPECIFICS
Once an exacting hand process, mortising door stiles is swift work in the shop with a power hollow-chisel mortiser. Basically a sophisticated drill press, the tool’s heart is a twist bit encased in a square chisel. By lowering the mortiser with a foot pedal, the operator punches several square holes in a row to make a rectangular mortise, moving the stile across the table as he goes. It’s customary to make the mortises in a door the same width as the panels because plowing the groove for the panel also takes away part of the tenon. Since Richard beefed-up the dimensions of his door, both panels and mortises are increased to 5/8″ thick.
No less ingenious is the equipment for making tenons. With the single-end tenoner the stock rides on a carriage through three sets of cutters that 1) shape the top and bottom of the tenon, 2) cope the shoulder so it matches the profile on the door stile, and 3) trim the end of the tenon to length. Depending upon the length of the tenon, making a finished tenon may take two or three passes through the machine. However, this is still only a fraction of the time once required to cut tenons by hand with a backsaw, and considerably more accurate.
Once all the pieces are made, panel doors must be carefully assembled on a large work-table. Starting with a middle rail, the joiner fits pieces together, sliding the panels into ploughs or grooves as he goes. Last to go on are the stiles at each side, followed by pipe clamps that hold the door together temporarily. At this point, the joiner bores 1/4″ or 5/16″ holes in the mortise and tenon joints and secures them with pegs. These pine pegs are made with squared off sides to produce the proverbial “square peg in a round hole” that wedges the peg in a very tight joint.
Chuck also likes to glue his joints with common aliphatic resin carpenter’s glue, a product unavailable to 18th century joiners. Though the glue makes the joints doubly secure, it has a quick set-up time that means assembly must move quickly. Altogether, the door is a very sturdy piece of construction. The big mortise and tenon shoulders, cut to close tolerances on precision equipment, add considerable strength to the system.
However, for the final period touch on doors like Richard’s, Chuck and his shop turn to hand tools. Here they hand-plane all stiles and rails before they’re assembled. This process takes some skill and care to maintain uniform thicknesses of all parts so that there is no difference in the completed joints.
Before the age of steam-powered milling machinery, early joiners used surfacing planes to smooth and reduce the wood to the desired thickness. Workaday woodwork might warrant only a basic “scrub planing”; finish joinery demanded a second round of planing. The cutting irons in these planes are ground to a slight arc, which keeps the edges of the iron from gouging the wood, as would happen with a straight-edged iron. Chuck’s shop shapes their irons in the same way, so the plane produces a characteristic, slightly scalloped appearance in raking light. This look is the hallmark of all handmade joinery and the fitting finish to two newly recreated pre-industrial doors.


Panel Doors in Production
Though adding raised panels and mouldings on the frame dresses up the door, construction remains the same—even when produced with modern millwork machinery: 1) Dave Sylvester slides panels into a door frame of rails and stiles; 2) the shaper/feeder does the work of planes for adding moulded edges and profiles; 3) cutters on the tenoner form both sides of the tenon, then trim it to length; 4) the chisel mortiser punches several holes in a row for one mortise; 5) surface planing by hand adds period finish.
SPECIAL THANKS to Richard Pieper (Jan Hird Pokorny Associates, New York, NY) and Chuck Bellinger (Architectural Components,. 26 North Leverett Rd. Montague, MA 01351; 413-367-9441)

Checked and weathered by 200 years of use and reuse, yet very much intact, these wide pine boards show the shiplap joinery and double-plank thickness of a textbook fully battened door.

Judging by the evidence found in the building, the blue batten door and transom of Richard Pieper’s vernacular farmhouse are close to what was there In the 1790s. The ochre panel door on the side, however, dates to an 1830s makeover in the Greek Revival style.


Beyond scraps of 19th century newspaper still pasted to the surface, the batten door face shows the telltale metal loops of the clinched nails that hold it together.

Inside, each batten of the reproduction door half-laps the next in a shiplap joint. The thumbnail moulding copies the original, as do the thumblatch and iron box lock.

There’s more to clinch-nailing than simply knocking the point over. The carpenter either bends the nail over a small rod to turn it back into the wood, or hammers it into a metal plate for the same effect.

Mortise and tenon joints have their nuances too. Wide rails, such as lock rails and bottom rails, are best made with split tenons. This method limits the potential for compression set by limiting the dimensions in any one tenon. Note that tenons, panels and grooves are all the same thickness—typically 1/3 the frame thickness.

Full mortises are characteristic of pre-1860s frame-and-panel doors. In this construction method, the tenon extends all the way through the stile for maximum support. Note the scalloped surface of the door, the result of surface planing.


